Deploy First App
Overview
The OpenShift development environment supports end-to-end development and deployment of an application. The instructions below will show you how to do it.
You can create a new app using one of the Starter Kits. These have been created to include all the key components, configuration, and frameworks to get you started on creating the code you need for your solutions.
This video demonstrates how to work through the steps to create an application and use a deployment pipeline to install it into your development cluster.
Create an application
The following steps will help you deploy your first application in your own namespace inside your OpenShift development environment.
1. Open the Web Terminal
To be able to run CLI commands to drive common operations on the cluster you will first need to open your web terminal. - Click on your web terminal >_ icon in the header of the OpenShift Console. You should see a terminal open at the bottom of the console screen. With a banner saying TechZone Automation - Check you can run oc commands, run the following command
oc sync --version
Info
You will now be able to quickly create Tekton pipelines within OpenShift. Watch this short video for more information on how Tekton is replacing Jenkins in the enterprise CI space.
2. Create the development namespace
Before getting started, the development namespace/project needs to be created and prepared for the DevOps pipelines. This is something that would typically happen once at the beginning of a project when a development team is formed and assigned to the cluster.
This step copies the common secrets and configMaps that contain the CI/CD configuration from the tools namespace into the development namespace/project. This enables the pipelines to reference the values easily for your project.
oc sync dev-{your intials}
3. Open the Developer Dashboard
The Developer Dashboard makes it easy for you to navigate to the tools, including a section that allows you to select a set of preconfigured Starter Kits that make seeding your development project very easy.
-
If you are logged into the OpenShift console, you can select the tools menu and select Developer Dashboard
-
If you are on a laptop/desktop, open a browser and make sure you are logged into Github
4. Create your app in Git
-
From the Developer Dashboard, click on
tab Warning
-
If you are developing on a shared education cluster, you need to make it easy to identify your app. Please suffix the app name with your initials
{app name}-{your initials}(e.g.stockbffnode-mjp) and use the Git Organization for the shared environment. -
Your browser needs to be logged in to your GitHub account for a template to work. If the link from the tile displays the GitHub 404 page, log in and reload the page.
-
-
Pick one of the templates that is a good architectural fit for your application and the language and framework that you prefer to work with. For your first application, select the Typescript Microservice. This also works well in the web terminal.
Click on a
- Complete the GitHub create repository from template process.
Owner: Select a valid GitHub organization that you are authorized to create repositories within or the one you were given for the shared cluster (See warning above)
Repository name: Enter a name for your repo. GitHub will help with showing a green tick if it is valid (See warning above)
Description: Describe your app
Press Create repository from template
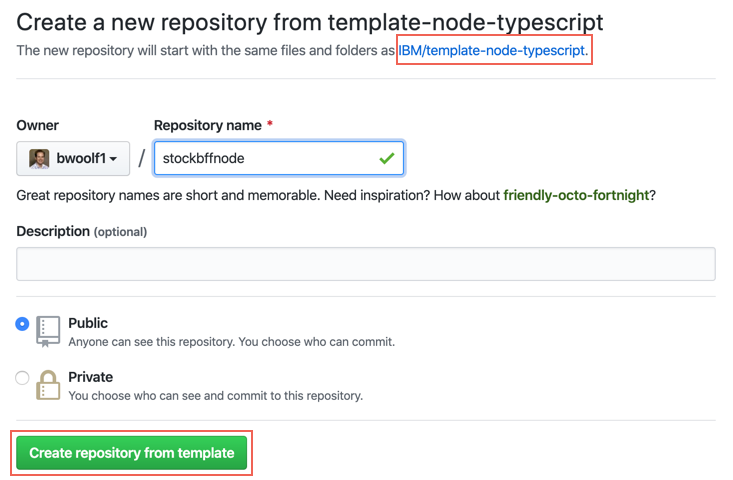
- The new repository will be created in your selected organization.
5. Register the application in a OpenShift Pipeline
Info
We will be using the pipeline command and specifically the tekton technology to setup the CI pipeline. The pipeline command gives an option for both Jenkins and Tekton make sure you select Tekton. For more information about working with the different build engines, please see Continuous Integration with Jenkins Guide and Continuous Integration with Tekton Guide
-
Open a browser to the Git repository created in the previous step.
-
Copy the url to the Git repository. For GitHub this is done by pressing the
Codebutton and copying the url provided in theClonesection. -
Start the process to create a pipeline from your Web Terminal
oc pipeline ${GIT_URL} --tektonFor example:
oc pipeline https://github.com/gct-showcase/inventory-svc-mjp --tekton -
For the deployment of your first app with OpenShift we have selected Tekton as the CI engine.
-
The first time a pipeline is registered in the namespace, the CLI will ask for a username and Password/Personal Access Token for the Git repository that will be stored in a secret named
git-credentials.Username: Enter your GitHub user id
Personal Access Token: Paste your GitHub personal access token
-
When registering a
Tektonpipeline, the CLI will attempt to determine the runtime used by the repository that was provided and filter the available pipelines. If only one matches then it will be automatically selected. If it cannot find a match or there is more than one match then you will be prompted to select the pipeline. -
When registering a
Tektonpipeline, the CLI also reads the available parameters from the pipeline and generates prompts for input. In this case, the option of scanning the built image for vulnerabilities is the only options. The scan is performed by the Vulnerability Advisor if you are using IBM Image Registry or by Trivy if another image registry is used. This scan is performed in "scan" stage of pipeline after "img-release" stage.? scan-image: Enable the pipeline to scan the image for vulnerabilities?(Y/n) -
The pipeline also prompts for linting the dockerfile
? lint-dockerfile: Enable the pipeline to lint the Dockerfile for best practices? (Y/n) -
To skip the scan, you have type "n" (No).Otherwise, type "y" (Yes) for performing Vulnerability Scanning on the image. Similarly, for skipping the linting of dockerfile,you have type "n" (No).Otherwise, type "y" (Yes) for performing Dockerfile lint.
-
After the pipeline has been created,the command will set up a webhook from the Git host to the pipeline event listener.
Note: if the webhook registration step fails, it is likely because the Git credentials are incorrect or do not have enough permission in the repository.
-
When the command is completed it will present options for next steps. You can use the Tekton cli commands to inspect the pipeline run that has been created and tail the log and/or navigate to the provided url to see the pipeline running from the OpenShift console.
7. View your application pipeline
The steps to view your registered pipeline will vary based on type of pipeline (Jenkins or Tekton) and container platform version.
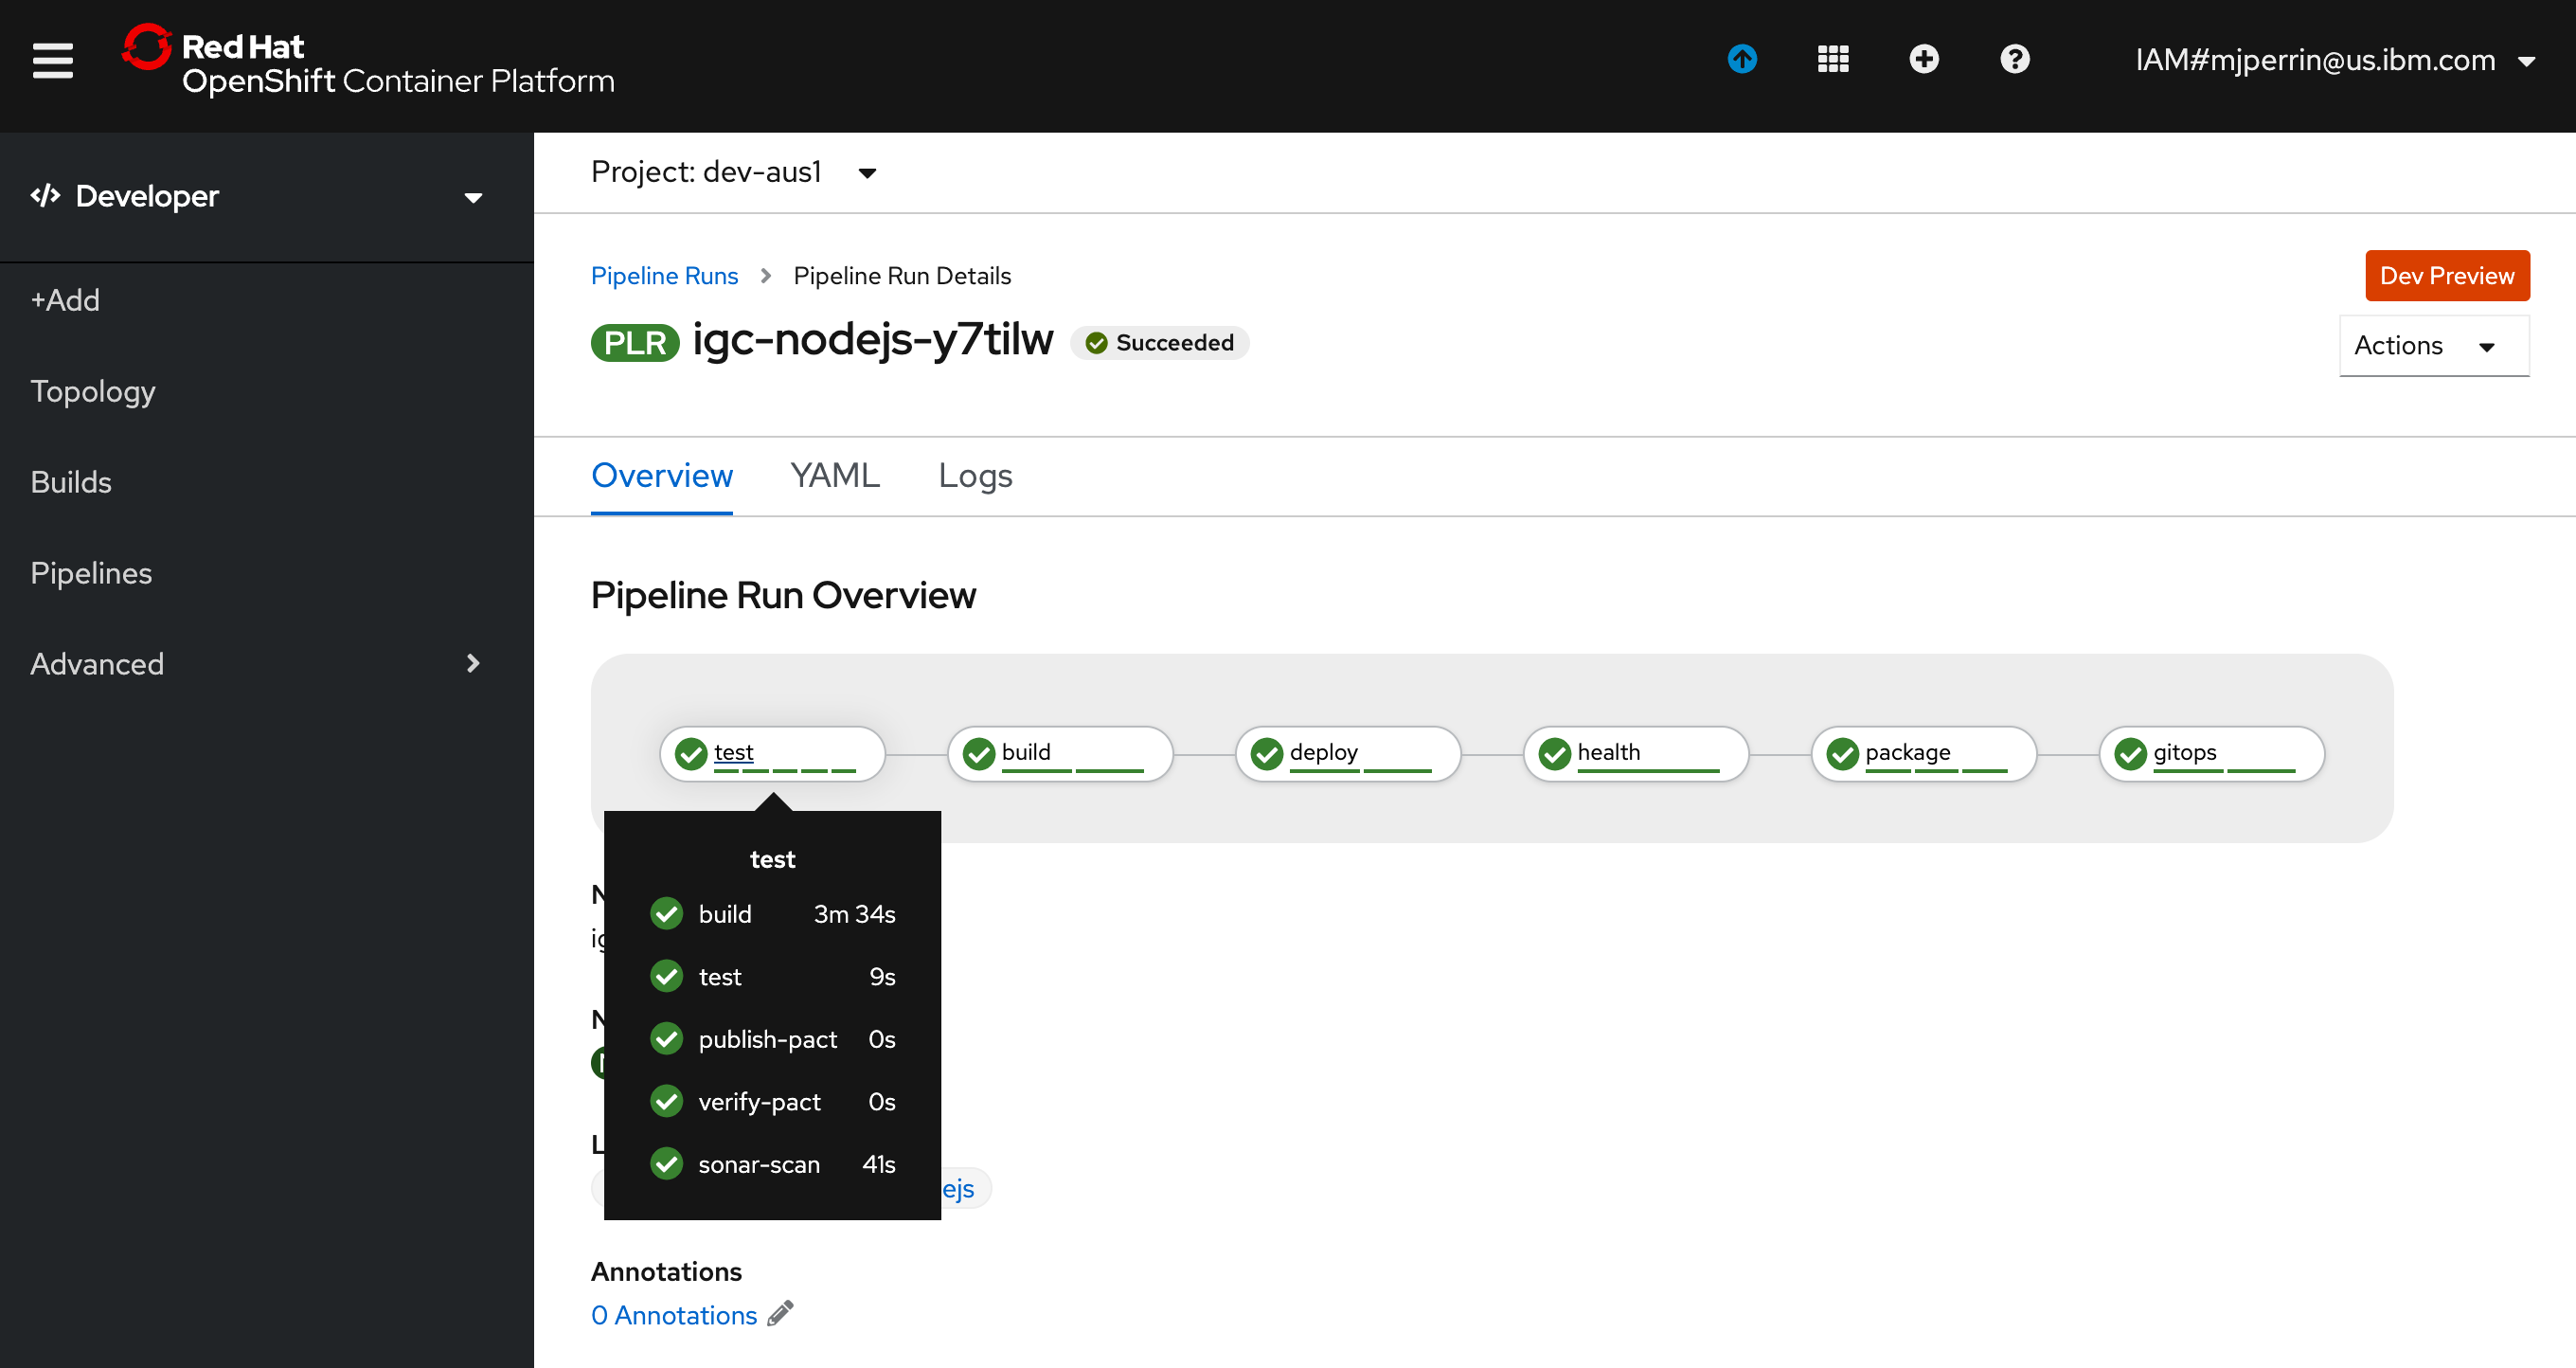
- From the OpenShift Web Console select the Pipelines menu in the Developer view
- You will see your microservice now running an OpenShift pipeline using Tekton Tasks
8. Access the running app
Once the pipeline has completed successfully, the app will be deployed into the namespace used when registering the pipeline. To validate the app is running follow these steps:
Note: Be sure the namespace context is set correctly by running the following command
oc project
-
Retrieve the app ingress endpoint using commands below in your terminal.
oc endpoints -
From the endpoints listed, select the URL for the repo that was just deployed and press Enter to open that URL in a web browser. Validate the application is working as expected.
9. Locate the app in the web console
The build pipeline is configured to build the source code from the Git repository into a container image. This image is stored in the Image Registry. After that, the image is deployed into the same namespace/project within the development cluster where the pipeline ran and validated for its health. The steps below will walk through locating the installed application within the Web Console.
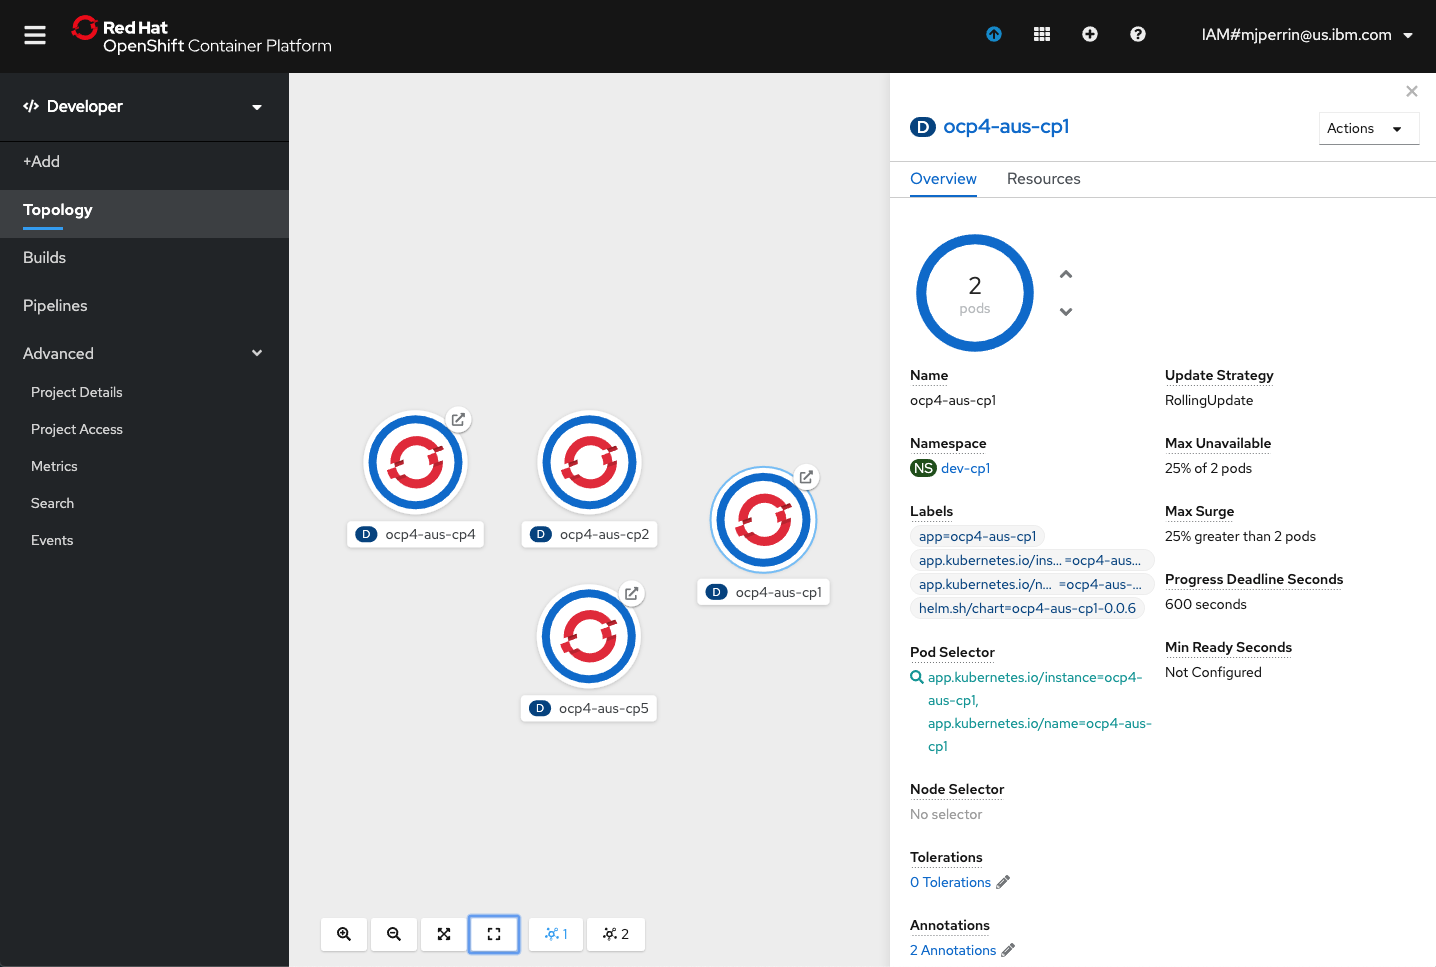
- Open the OpenShift web console
- Change to the Developer view
- Click on Topology menu
- Click on your application deployment in the topology view
- Click on the Overview tab
- Increase the number of running pods to 2 pods
- Click on the Resources tab to view the list of pods
- Click on View Logs link to view the logs from each pod
- You can see the running state of your application
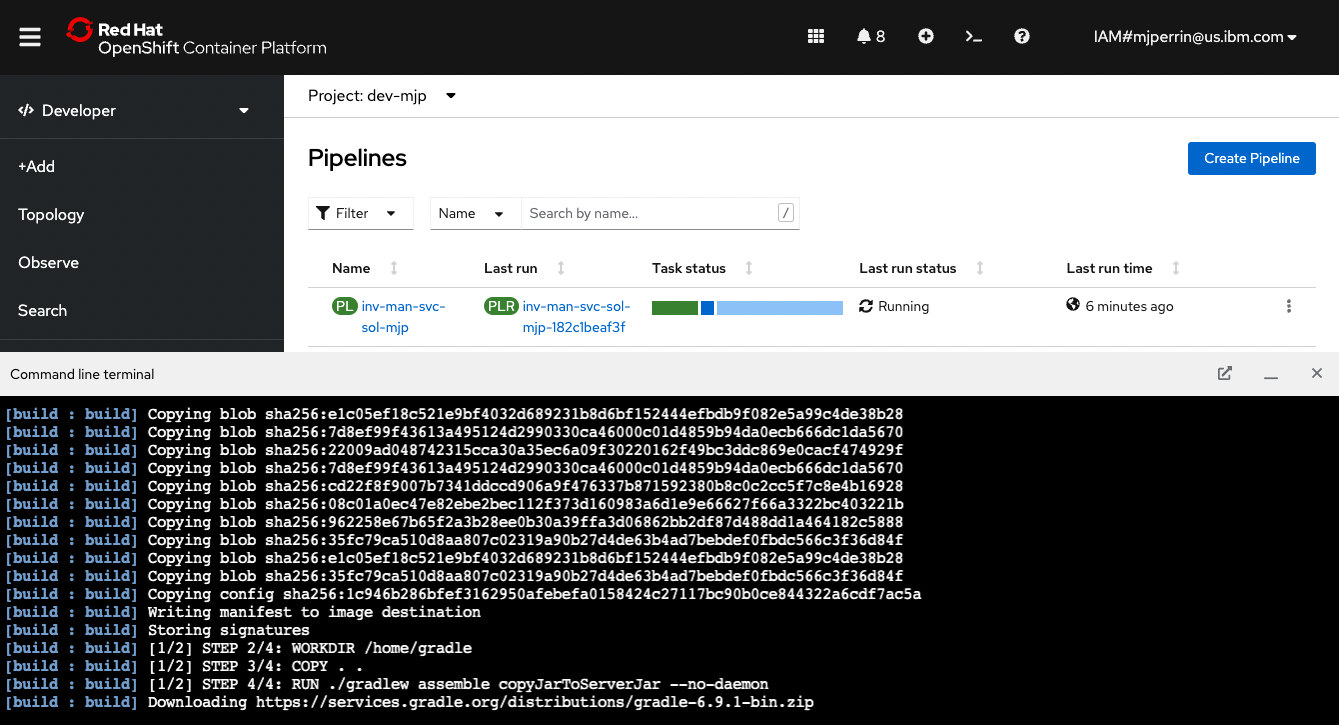
10. Check how build is progressing
Now you have looked the pipeline running in the console, you can view the running tasks and view the logs from the Web Terminal.
At the end of the oc pipeline command you will see two tkn CLI commands output onto the console. Copy the values for this and run them in your web terminal.
Next steps:
  Tekton cli:
    View PipelineRun info - tkn pr describe <app>-<id>
    View PipelineRun logs - tkn pr logs -f <ap>-<id>
Success
Success: You now have your application running inside your development cluster and being delivered using a Tekton based CI pipeline. This is the beginning of the developer journey with IBM Cloud.
Having reached this point, we recommend you repeat the process a few more times using different Code Patterns templates and explore the Developer view in OpenShift to get familiar with it.
11. Run the application locally
Most developers like to run the code natively in local development environment. To do so, follow the instructions listed in the README.md file to run the code locally. You may be required to install a specific runtime like Java, Node or Go.
-
If you want to quickly access your git repo you can run a helper command to open the git webpage.
oc git -
From inside the folder where the code was cloned from GitHub, run the following command to install the Node.js dependencies.
npm install - Run the following command to start the application.
npm run start
12. Make a change to your code
Within GitHub it is possible to open a full Visual Studio code web editor and make changes to you code.
Info
The limitation is that you cannot do local testing for the learning journey it will be OK to make edits and lets the Tekton pipeline do the validation of the code.
Editing Code in GitHub
To edit your code in GitHub follow the tests below.
- Open your GitHub repository where your code was created from the template.
- Using your computer keyboard type the
.key, this will open the repo into the visual editor. - All the Starter Kits have a health API endpoint within them. Navigate to the code for the health endpoint. For Go its in
routes/Health.goand for Node Typescript it is insrc/controllers/health.controller.tsfile. - Edit the code and change the
status:text to something like below.@GET async healthCheck(): Promise<{status: string,message: string;}> { return { status: 'UP', message : "App is up and running with TechZone Automation" }; } - Save your changes.
- Now update the test that validates this API open up
test/controllers/health.controller.spec.tsand update theexpectto match the value that is now being returned in the API.describe('Given /health', () => { test('should return 200 status', () => { return request(app).get('/health').expect(200); }); test('should return {status: "UP:}', () => { return request(app).get('/health').expect({ status: 'UP', message : "App is up and running with TechZone Automation" }); }); }); - Click on the Source Control icon on the left it will say
21 pending changes - Click on the
+icon to stage the changes - Click on the tick icon at the top to push the changes, remember to add a commit message something like
Update Health API and Test with message value - Navigate back to the OpenShift console and click on Pipeline view you will see the tekton pipeline has kicked off again based on your code change. This will make it run through the build and deploy cycle.
Local Development
You can update your code locally using git command line.
- Go to your cloned git project and navigate to chart/base directory.
cd stockbffnode cd chart/base - Open the file
Chart.yamlin edit mode and change thedescriptionfield's value from "A Helm chart for Kubernetes" to "A Helm chart for [yourprojectName]" - Save the edits
- Push the changes back to your repository
git add . git commit -m "Updated application name in Chart.yaml" git push - As soon as you push your code changes successfully, the webhook will trigger a new pipeline run for your project in your namespace in OCP.
Warning
Note: if the webhook registration step fails, the git push will not trigger the pipeline.