UI
Develop and deploy the UI component of the inventory application
Setup
Create your OpenShift project and register the pipeline
-
Create a new repository from the Carbon React template into your Git org.
Warning
If you are developing on a shared education cluster, place the repository in the Git Organization listed in your notification email and remember to add your initials as a suffix to the app name. - In order to prevent naming collisions, name the repository
inv-ui-{your initials}replacing{your initials}with your actual initials. -
Deploy this application with Tekton pipelines :
-
In the OpenShift web console, head up to Topology menu on the left on the Developer perspective and click Create a new project.
-
Give a name to your project, call it
dev-{your initials}, the other fields are optional. -
Initialize a web terminal using the
>_button on the top bar next to your name on the cluster. You should have a terminal with all the necessary development tools.
Note
You should have the oc and igc command line tools installed. If not, refer to the developers tools setup page.
- In the OpenShift web console, click on email address top right, click on Copy login command and get the OpenShift login command, which includes a token.
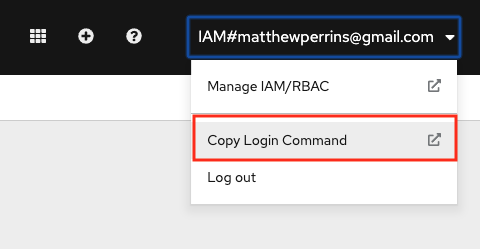
- Click on Display Token, copy the Login with the token. oc login command will log you in. Run the login command in your terminal:
$ oc login --token=qvARHflZDlOYfjJZRJUEs53Yfy4F8aa6_L3ezoagQFM --server=https://c103-e.us-south.containers.cloud.ibm.com:30979
Logged into "https://c103-e.us-south.containers.cloud.ibm.com:30979" as "IAM#email@company" using the token provided.

You have access to 71 projects, the list has been suppressed. You can list all projects with 'oc projects'
- Run the following command to setup your project:
oc sync dev-{your initials}
- Register the pipeline, give git credentials if prompted, and main as the git branch to use. When prompted for the pipeline, select
ibm-nodejs.
oc pipeline --tekton https://github.com/cnw-team-{team}/inv-ui-{your initials}
-
Open the pipeline to see it running
-
When the pipeline is completed, run
oc endpoints -n dev-{your initials}. You should see an entry for the app we just pushed. Select the entry and hitEnterto launch the browser.
Choose your development environment
-
Head over to gitpod.io, login with your github account by clicking Continue with GitHub.
-
Grant access to gitpod to your GitHub organization by going to account settings on the top right corner, navigate to Integrations, go to GitHub and click Manage on GitHub.
-
On GitHub, search the organization you have used to create the repository and click grant to allow gitpod to access repositories in that organization.
-
Back to gitpod.io, navigate to workspaces and click New Workspace to create a new workspace, give it your newly created repository URL.
-
If it is your first gitpod workspace, it will ask you for your preferred editor, pick the in browser Visual Studio Code, and the workspace will be created automatically for you.
You are now ready to modify the application!
Clone the project and open it using your favorite text editor or IDE (Visual Studio Code, Atom...).
git clone https://github.com/cnw-team-{team}/inv-ui-{your initials}.git
cd inv-ui-{your initials}
code .
Create the initial components
Based on the requirements of this first use case, we will create a StockItemList component to list stock items.
-
Open a terminal and start the application in development mode to see the initial UI and the changes as we make them:
yarn start:dev -
Access the running service. This service runs by default on port
3000. -
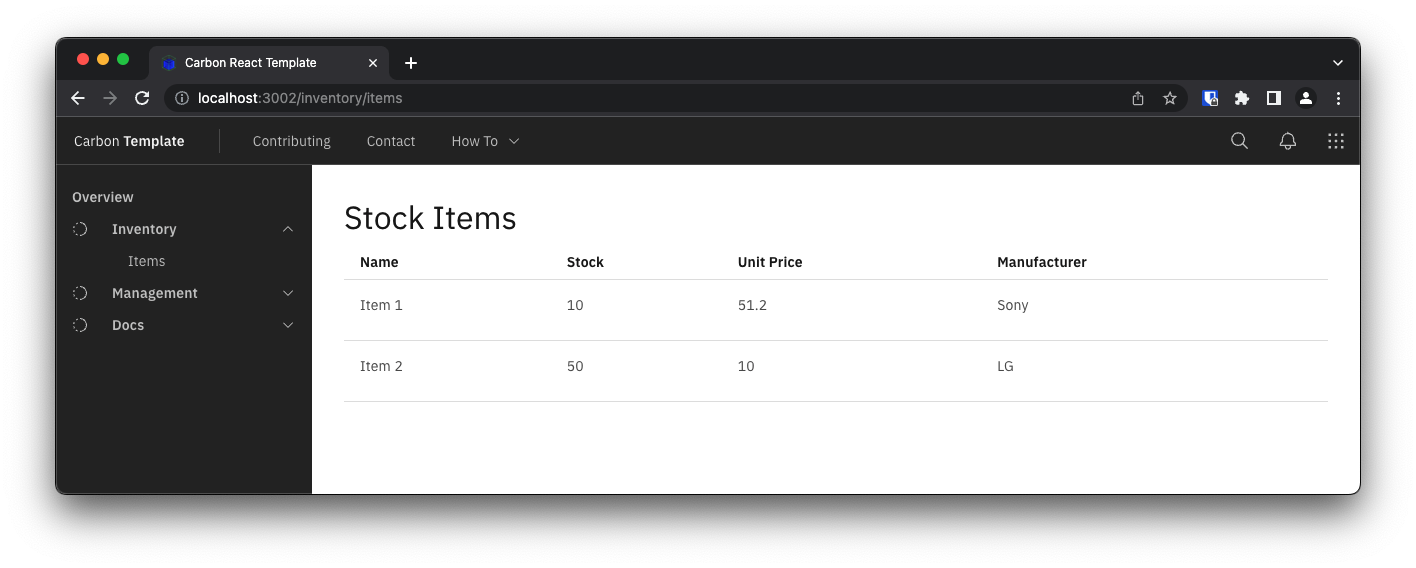
Create the
StockItemListReact component that uses aStructuredListfrom the Carbon React Components portfolio:src/content/StockItemList.jsximport React from "react"; import { StructuredListWrapper, StructuredListHead, StructuredListRow, StructuredListCell, StructuredListBody } from '@carbon/react'; const DEFAULT_ITEMS = [ { name: 'Item 1', stock: 10, unitPrice: 51.2, manufacturer: 'Sony' }, { name: 'Item 2', stock: 50, unitPrice: 10, manufacturer: 'LG' }, ] export default function StockItemList() { const items = DEFAULT_ITEMS; return ( <div className="stock-items-list"> <h2>Stock Items</h2> <StructuredListWrapper> <StructuredListHead> <StructuredListRow head> <StructuredListCell head>Name</StructuredListCell> <StructuredListCell head>Stock</StructuredListCell> <StructuredListCell head>Unit Price</StructuredListCell> <StructuredListCell head>Manufacturer</StructuredListCell> </StructuredListRow> </StructuredListHead> <StructuredListBody> {items.map(item => ( <StructuredListRow> <StructuredListCell noWrap>{item.name}</StructuredListCell> <StructuredListCell noWrap>{item.stock}</StructuredListCell> <StructuredListCell noWrap>{item.unitPrice}</StructuredListCell> <StructuredListCell noWrap>{item.manufacturer}</StructuredListCell> </StructuredListRow> ))} </StructuredListBody> </StructuredListWrapper> </div> ); } -
Now that we have our component to list stock items, let's add it to out app by editing the
src/content/UIShell/UIShell.jsxfile:- Add our new component to the bottom of the imports section: src/content/UIShell/UIShell.jsx
... import StockItemList from "../StockItemList"; ... - Add a menu to our left navigation panel to link to a new
/inventory/itemsroute that we'll use to list stock items:src/content/UIShell/UIShell.jsx... <SideNav aria-label="Side navigation" expanded={isSideNavExpanded}> <SideNavItems> <SideNavMenuItem element={Link} to='/' isActive={this.state.activeItem === '/'} onClick={() => { this.setState({ activeItem: '/' }) }}> Overview </SideNavMenuItem> <SideNavMenu renderIcon={Fade} title="Inventory" defaultExpanded> <SideNavMenuItem element={Link} to='/inventory/items' isActive={this.state.activeItem === '/inventory/items'} onClick={() => { this.setState({ activeItem: '/inventory/items' }) }}> Items </SideNavMenuItem> </SideNavMenu> <SideNavMenu renderIcon={Fade} title="Management"> <SideNavMenuItem href="#"> Link </SideNavMenuItem> <SideNavMenuItem href="#"> Link </SideNavMenuItem> <SideNavMenuItem href="#"> Link </SideNavMenuItem> </SideNavMenu> <SideNavMenu renderIcon={Fade} title="Docs"> <SideNavMenuItem href="#"> Link </SideNavMenuItem> <SideNavMenuItem href="#"> Link </SideNavMenuItem> </SideNavMenu> </SideNavItems> </SideNav> ... - Add a new route for the
/inventory/itemsroute:src/content/UIShell/UIShell.jsx... <Routes> <Route path="/" element={<LandingPage />} /> <Route path="/inventory/items" element={<StockItemList />} /> <Route path="*" element={<NotFound />} /> </Routes> ...
- Add our new component to the bottom of the imports section:
-
Open the application to check that you can now navigate to the Stock Items view:
-
With the application running in the first terminal, open a second terminal in the repository directory and push the changes we've just made:
git add . git commit -m "Initial shell components" git push -
On the openshift console, open the pipeline to see it running.
Add a service component to get mock Stock Items
Now that we've created the initial components, we can start to customize the StockItemList to match the data for our application. So far, we've built a UI that displays a hard-coded set of data in a table. Eventually, we want to display dynamic data provided from a database in the table. As a first step towards that goal, we need to separate the UI logic from the logic that retrieves the data. We will do that with a service component. For this first pass the service component will just return mock data.
-
Create a
src/services:mkdir src/services -
Create a file named
stock-item-mock.service.jsin the service directory, implementing the service by copying the data array fromStockItemListand returning it in the function. You can add asetTimeout()1s timeout to simulate loading:src/services/stock-item-mock.service.jsexport class StockItemMockService { async listStockItems() { return new Promise(resolve => { // Wait 1 second before returning data setTimeout(() => { resolve([ { id: 1, name: 'Item 1', stock: 10, unitPrice: 51.2, manufacturer: 'Sony' }, { id: 2, name: 'Item 2', stock: 50, unitPrice: 10, manufacturer: 'LG' }, ]); }, 1000) }); } } -
Update the components to pass the service in the properties:
src/App.test.jsximport { render, screen } from '@testing-library/react'; import App from './App'; import {StockItemMockService} from "./services/stock-item-mock.service"; describe('App', () => { test('canary verifies test infrastructure', () => { expect(true).toEqual(true); }); test('renders text', () => { Object.defineProperty(window, "matchMedia", { writable: true, value: jest.fn().mockImplementation(query => ({ matches: false, media: query, onchange: null, addListener: jest.fn(), // Deprecated removeListener: jest.fn(), // Deprecated addEventListener: jest.fn(), removeEventListener: jest.fn(), dispatchEvent: jest.fn(), })) }); render(<App stockService={new StockItemMockService()}/>); const linkElement = screen.getByText(/Design & build with Carbon/i); expect(linkElement).toBeInTheDocument(); }); });src/App.jsximport React, { Component } from 'react'; import UIShell from './content/UIShell/UIShell'; import './App.scss'; import { StockItemMockService } from "./services/stock-item-mock.service"; class App extends Component { constructor(props) { super(props); this.stockService = props.stockService || new StockItemMockService(); } render() { return ( <div className="app"> <UIShell stockService={this.stockService} /> </div> ); } } export default App;src/content/UIShell/UIShell.jsx... <Routes> <Route path="/" element={<LandingPage />} /> <Route path="/inventory/items" element={<StockItemList stockService={this.props.stockService} />} /> <Route path="*" element={<NotFound />} /> </Routes> ... -
Update
StockItemList.jsxto use the provided service:src/content/StockItemList.jsximport React from 'react'; import { useQuery } from '@tanstack/react-query'; import { StructuredListWrapper, StructuredListHead, StructuredListRow, StructuredListCell, StructuredListBody, StructuredListSkeleton } from '@carbon/react'; export default function StockItemList(props) { const { isLoading, error, data } = useQuery(['stock-items'], props.stockService.listStockItems); return ( <div className='stock-items-list'> <h2>Stock Items</h2> {isLoading ? <StructuredListSkeleton /> : error ? 'Error retrieving stock items' : <StructuredListWrapper> <StructuredListHead> <StructuredListRow head> <StructuredListCell head>Name</StructuredListCell> <StructuredListCell head>Stock</StructuredListCell> <StructuredListCell head>Unit Price</StructuredListCell> <StructuredListCell head>Manufacturer</StructuredListCell> </StructuredListRow> </StructuredListHead> <StructuredListBody> {data.map(item => ( <StructuredListRow key={item.id}> <StructuredListCell noWrap>{item.name}</StructuredListCell> <StructuredListCell noWrap>{item.stock}</StructuredListCell> <StructuredListCell noWrap>{item.unitPrice}</StructuredListCell> <StructuredListCell noWrap>{item.manufacturer}</StructuredListCell> </StructuredListRow> ))} </StructuredListBody> </StructuredListWrapper>} </div> ); } -
Open the app in your browser, if the app isn't started run:
yarn start:dev -
Push the changes we've made to the repository:
git add . git commit -m "Adds a mock service" git push -
On the openshift console, open the pipeline to see it running.
Add a service that calls the BFF
Now that we have a mock service that injects data, we can build an implementation of the service that calls our BFF. For the service, we will use axios to make GraphQL calls to the BFF through an HTTP proxy exposed by the server, using http-proxy-middleware.
-
Install
axiosandhttp-proxy-middleware:yarn add http-proxy-middleware axios -
Update the server to proxy BFF requests (configured in
API_HOSTenvironment variable) to/apiendpoint:server/server.jsconst express = require('express'); const path = require('path'); const { createProxyMiddleware } = require('http-proxy-middleware'); const app = express(); app.use(express.static(path.join(__dirname, '../build'))); app.use( '/api', createProxyMiddleware({ target: process.env.API_HOST ?? 'http://example.com', changeOrigin: true, pathRewrite: { '^/api': '/' }, }) ); app.get('/health', function (req, res) { res.json({ status: 'UP' }); }); app.get('/*', function (req, res) { res.sendFile(path.join(__dirname, '../build', 'index.html')); }); const port = process.env.PORT ?? 3000; app.listen(port, function () { console.info(`Server listening on http://localhost:${port}`); }); -
Add a
src/setupProxy.jsfile to setup the proxy for local development:src/setupProxy.jsconst { createProxyMiddleware } = require('http-proxy-middleware'); module.exports = function(app) { app.use( '/api', createProxyMiddleware({ target: process.env.API_HOST ?? 'http://example.com', changeOrigin: true, pathRewrite: { '^/api': '/' }, }) ); }; -
Create a service implementation in the
servicesdirectory calledstock-item.service.jsimplementinglistStockItems()that calls the BFF through the/apiproxy:src/services/stock-item.service.jsimport axios from "axios"; export class StockItemService { constructor(baseUrl) { this.baseUrl = baseUrl || '/api'; } async listStockItems() { return axios({ url: '/api/graphql', method: "POST", data: { query: ` { stockItems { id manufacturer name picture stock unitPrice } } ` } }).then(response => response.data.data.stockItems); } } -
Update
App.jsxto use the new service instead of the mock service:src/App.jsximport React, { Component } from 'react'; import UIShell from './content/UIShell/UIShell'; import './App.scss'; import { StockItemService } from "./services/stock-item.service"; class App extends Component { constructor(props) { super(props); this.stockService = props.stockService || new StockItemService(); } render() { return ( <div className="app"> <UIShell stockService={this.stockService} /> </div> ); } } export default App; -
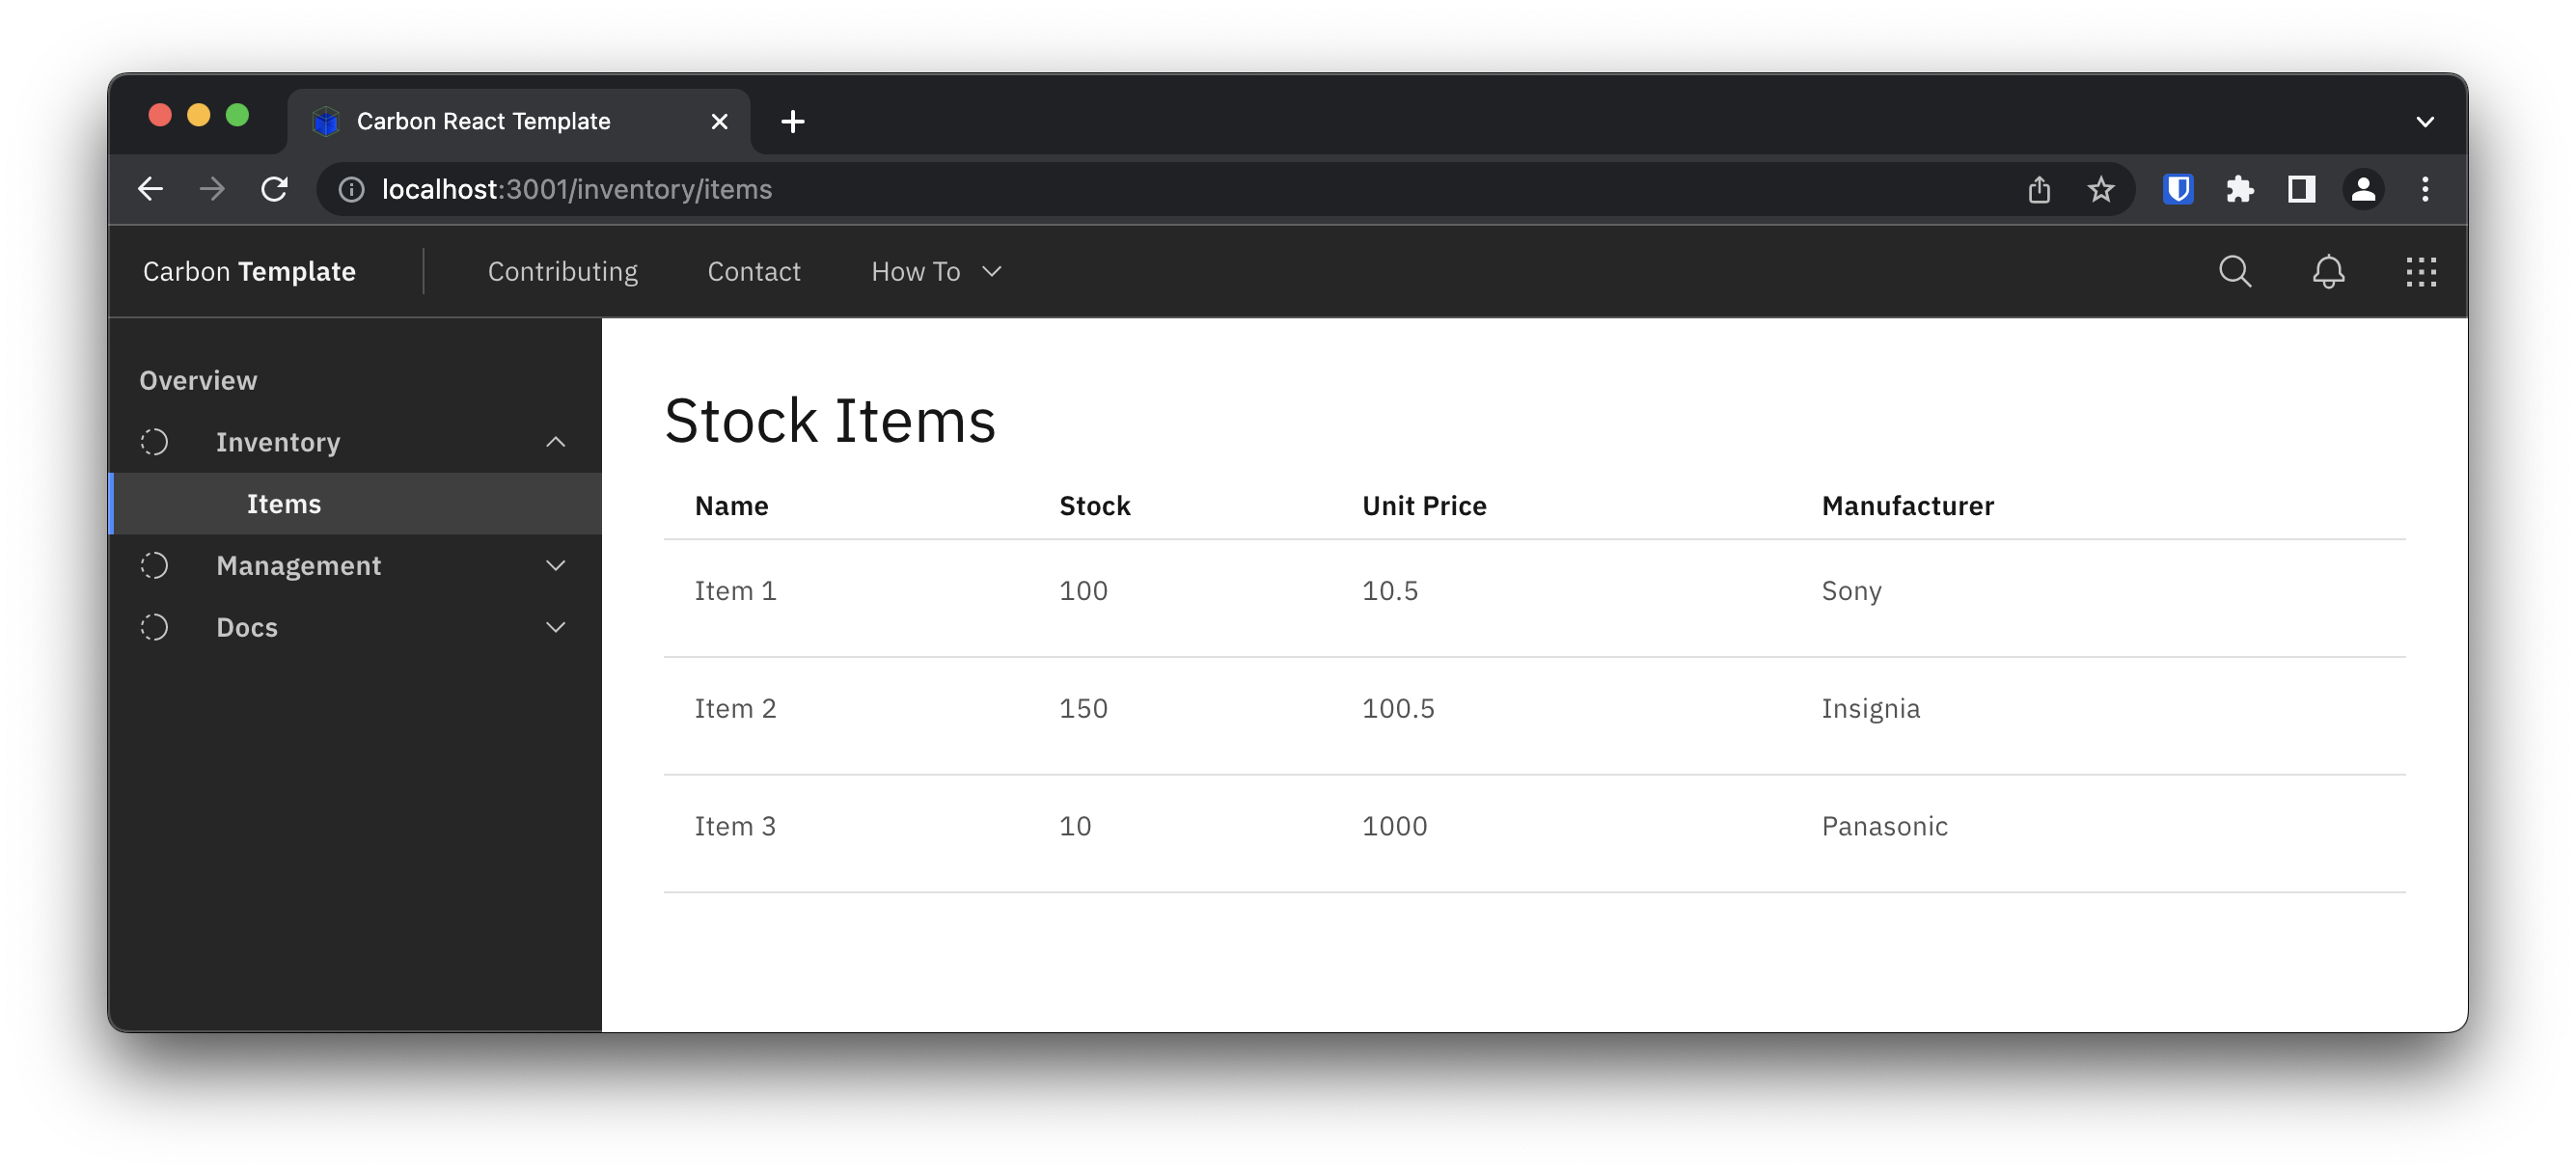
Open the application to check that your app is now retrieving data from BFF GraphQL endpoint:
-
Modify
connectsToproperty to thevalues.yamlfile of the Helm chart. The value of the property should match the Kubernetes service of the microservice. (For template projects, the service name is the same as the name of the application which is that same as the name of the repository):chart/base/values.yaml... connectsTo: inv-bff-{your initials} ... -
Add a new environment variable named
API_HOSTto the list of existing environment variables in deployment.yaml. The value of this environment variable should come from theconnectsTovalue we defined. You can add| quoteto wrap the value in quotes in case the value is not formatted correctly:chart/base/templates/deployment.yaml... env: - name: INGRESS_HOST value: "" - name: PROTOCOLS value: "" - name: LOG_LEVEL value: {{ .Values.logLevel | quote }} - name: API_HOST value: {{ printf "%s:80" .Values.connectsTo | quote }} ... -
Push the changes we've made to the repository:
git add . git commit -m "Updates the StockItemsList view" git push -
On the openshift console, open the pipeline to see it running.
Summary
Congrats! You have now completed the Micro App Guide demonstrating the Inventory solution.